Selecting the Right Lighting for Your Display Cases

Exposure to high-intensity light can cause irreversible damage to plasticizers and pigments in as little as six months. This guide covers how to select, install, and manage lighting for your collectible display cases to ensure your figures look spectacular without the risk of UV degradation. We'll look at light temperatures, bulb types, and the physical placement of LEDs to protect your investment.
What Type of Light is Best for Collectibles?
LED (Light Emitting Diode) lighting is the best choice for collectors because it produces minimal heat and lacks the UV radiation found in traditional bulbs. If you use old-school incandescent bulbs, you're essentially running a tiny heater inside your display case—which is a recipe for disaster for delicate plastics.
When you're looking at your shelves, you're not just looking for brightness; you're looking for color accuracy. A high-end 1/6 scale figure from Hot Toys or a vintage Star Wars figure deserves light that shows off the paint application without washing out the details.
There are three main things to watch for when choosing your light source:
- Color Temperature (Kelvin): This determines how "warm" or "cool" the light looks.
- CRI (Color Rendering Index): This measures how accurately the light shows colors.
- Heat Output: This is the physical temperature the bulb emits.
Most collectors prefer a "neutral white" light, which sits around 4000K. It’s bright enough to see the sculpt of a Warhammer 40,000 miniature but doesn't have that sickly yellow tint of a household lamp.
If you're displaying a gritty, battlefield-themed diorama, you might want a warmer 2700K light. But be careful—warmer lights often have higher levels of infrared, which can heat up the air inside a closed acrylic case.
Understanding Color Temperature (Kelvin)
The Kelvin scale is your best friend when shopping for light strips. A lower number means warmer, yellower light; a higher number means cooler, bluer light.
For most-loved collections, I recommend staying in the 3500K to 4500K range. It looks clean, professional, and mimics natural daylight. If you've ever seen a display that looks "cheap," it's often because the light is too blue (high Kelvin), making the plastics look artificial and harsh.
Check out the Wikipedia page on color temperature if you want to see the full spectrum of how light shifts from one end to the other. It's a lot of math, but for a collector, it's just about the vibe.
How Much Light Exposure Destroys Plastic?
UV radiation is the primary enemy of long-term preservation, as it breaks down molecular bonds in polymers. While LED lights are generally safe, any light source that emits a significant amount of UV or high-intensity visible light can accelerate the degradation of your figures.
This is particularly problematic for vintage items. If you're displaying unsealed 1970s-era action figures, the light isn't just a visual issue—it's a preservation threat. We've talked about why vintage action figures get sticky, and light-induced heat is a major contributor to that chemical breakdown.
The catch? Even "safe" light can cause issues if the light is too close to the figure. If an LED strip is touching the back of a vinyl figure, the concentrated heat can cause the plastic to soften or warp over time.
It's also worth noting that light isn't just about the bulb. The material of your display case matters too. Acrylic cases (like those from Lucite or Moderness) can actually act as a lens, sometimes magnifying the heat or light intensity.
| Light Source | Heat Output | UV Risk | Best Use Case |
|---|---|---|---|
| LED Strips | Very Low | Minimal | Daily Display / Long-term |
| Halogen | High | Moderate | Avoid for Collections |
| Incandescent | High | Low | Avoid for Collections |
| Fluorescent | Moderate | High | Short-term Display Only |
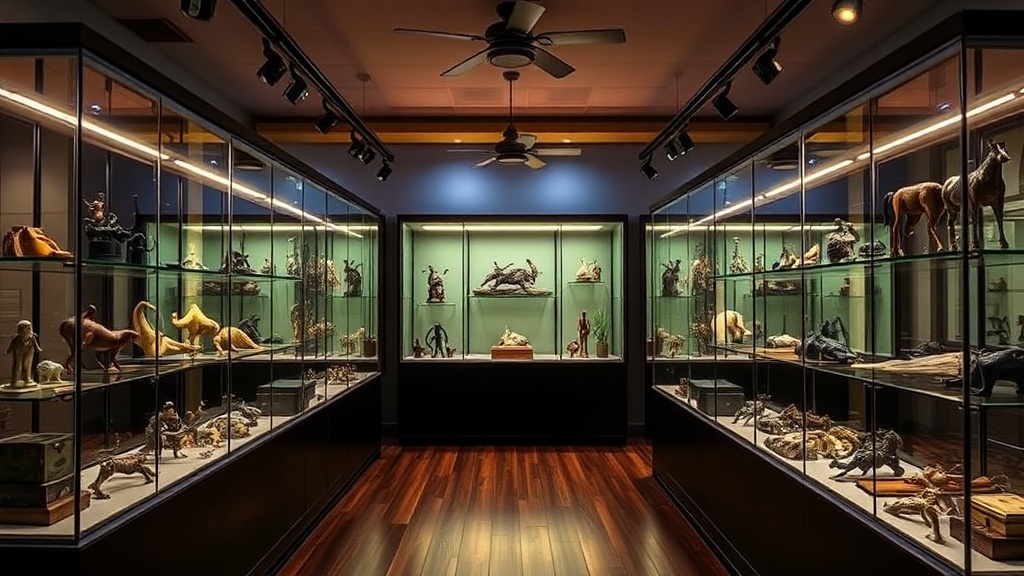
How Do I Position Lights to Avoid Glare?
Position your lights at an angle rather than directly above or in front of the figure to minimize harsh shadows and reflections. If you place a light directly in front of a glass or acrylic case, the viewer won't see the figure; they'll see their own reflection and the bright glare of the bulb.
For a single-shelf display, I usually suggest mounting the light on the underside of the shelf above. This creates a "top-down" look that emphasizes the sculpt of the figure. However, if you have a very tall figure—like a 12-inch Sideshow Collectibles piece—top-down lighting will leave the bottom half in total darkness.
In those cases, side-lighting is a better bet. By placing small LED spots on the left and right sides of the case, you create a "three-point lighting" effect. This adds depth and prevents the figure from looking flat or two-dimensional.
One thing to watch out for: shadows. If your light is too far back, your figure will cast a massive shadow on the back wall of the case. It looks messy. You want the light to wrap around the object, not fight against it.
If you're displaying smaller items, like a collection of Funko Pops or small 1:12 scale figures, you don't need much. A single, high-quality light strip along the front edge of the shelf is usually plenty.
Wait, what about the power source? If you're using a lot of lights, you'll likely have a lot of wires. I try to keep my wiring as clean as possible—running them down the back corners of the case—so they don't become a visual distraction.
If you're worried about the temperature inside your case, remember that air circulation is your friend. A sealed case with a high-wattage light is essentially an oven. Even with LEDs, if the case is airtight, the heat can build up. It might be worth looking into managing humidity and temperature to ensure your display remains a safe environment.
Quick Tips for Installation:
- Use Diffusers: If you see "dots" from your LED strip, use a frosted diffuser cover. It softens the light and makes it look like a professional studio setup.
- Avoid Direct Contact: Never let a light source touch the figure or the packaging.
- Test the Heat: After running your lights for an hour, touch the inside of the case. If it feels warm, your lights are too bright or too close.
- Dimmer Switches: If you can, buy a system with a dimmer. It's much easier to adjust the light to your liking than to buy new bulbs.
The goal is to create an environment where the figure is the star, not the light itself. A well-lit display should feel immersive. It should make you want to lean in and look at the fine details of that weathered armor or the tiny facial expressions on a miniature.
Don't overthink it. Start with a single, neutral-white LED strip, see how it looks, and adjust from there. Most of the time, less is actually more.